2016年7月6日水曜日

CoreAnimation Lesson.(Lesson2-2) - UIViewAnimationOptions/アニメーションイージングカーブ編

前回(Lesson2-1)ではブロックベースメソッドを使用した簡単なアニメーション実装について説明しました。引き続き、UIViewクラスのブロックベースアニメーションメソッドを使用したアニメーションについて説明していきます。

CoreAnimation Lesson.シリーズへのリンク。
アニメーションイージングカーブ
UIViewクラスのブロックベースアニメーションメソッド。
[Animating Views with Block Objects]
+ animateWithDuration:delay:options:animations:completion:
  1. class func animateWithDuration(_ duration: NSTimeInterval,
  2. delay delay: NSTimeInterval,
  3. options options: UIViewAnimationOptions,
  4. animations animations: () -> Void,
  5. completion completion: ((Bool) -> Void)?)

前回あまり詳しく説明出来なかった引数optionsについて説明します。 options引数は複数指定出来ますが、大きく3種類に分類することができて、

  • アニメーションの振る舞い
  • アニメーションイージングカーブ ←今回説明する部分
  • トランジションエフェクト

について設定出来ます。optionsの型は、UIViewAnimationOptionsとなっておりswiftだと構造体で、Objective-Cたと、emunで定義されている様です。 今回は、アニメーションイージングカーブについて説明します。

アニメーションイージングカーブは以下に示す4種類の設定が可能です。
UIViewAnimationOptions 概要
CurveEaseInOut ゆっくり始まって、加速して、ゆっくり止まる。
(デフォルト)
CurveEaseIn ゆっくり始まって、加速して急に止まる。
CurveEaseOut 急に始まり、ゆっくり止まる。
CurveLinear 初めから最後まで一定速度。
実装

基本的には以下に示す基本的なブロックベースアニメーションメソッドを使用します。以下は例としてoptionにCurveEaseInOutを指定しています。

  1. // EaseInOut
  2. let option:UIViewAnimationOptions = .CurveEaseInOut
  3. UIView.animateWithDuration(duration, delay: delay, options: option, animations: {
  4. // animation
  5. self.myView.frame.origin.y = topBarHeight + 50
  6. }) { (complete) in
  7. NSLog("animation completed.")
  8. // アニメーション完了時の処理
  9. self.myView.backgroundColor = UIColor.redColor()
  10.  
  11. }

それでは実際に動かしてみましょう。

UIViewAnimationOptions.CurveLinear

UIViewAnimationOptions.CurveLinearは、はじめから最後まで一定速度のアニメーション。

図.Linearアニメーションカーブ
図.UIViewAnimationOptions.CurveLinear
UIViewAnimationOptions.CurveEaseInOut

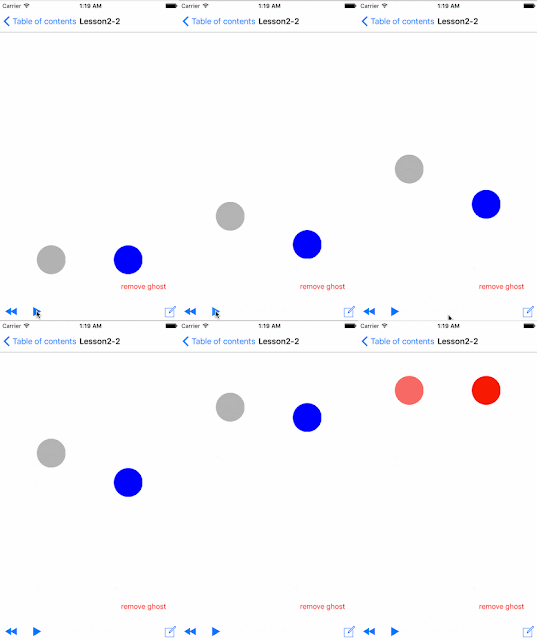
UIViewAnimationOptions.CurveEaseInOutは、ゆっくり始まって、加速して、ゆっくり止まります。Linear指定との違いをわかりやすくするため、右側の図では、左側にLinearを指定したもの、右側にEaseInOutを指定したViewをアニメーションしています。

図.EaseInOutアニメーションカーブ
図.UIViewAnimationOptions.CurveEaseInOut
UIViewAnimationOptions.CurveEaseIn

UIViewAnimationOptions.CurveEaseInは、ゆっくり始まって、加速して急に止まります。右側の図では左側にLinearを指定し、左側にEaseInを指定したアニメーションです。

図.EaseInアニメーションカーブ
図.UIViewAnimationOptions.CurveEaseIn
UIViewAnimationOptions.CurveEaseOut

UIViewAnimationOptions.CurveEaseOutは、急に始まり、ゆっくり止まります。右側の図では左側にLinearを指定し、左側にEaseOutを指定したアニメーションです。

図.EaseOutアニメーションカーブ
図.UIViewAnimationOptions.CurveEaseOut

サンプルプログラムはGitHubにあります。https://github.com/takuran/CoreAnimationLesson

CoreAnimation Lesson.シリーズへのリンク。

2016年6月26日日曜日

Core Animation Lesson.(Lesson2-1) - 基本のアニメーション

アニメーションしてみよう(Lesson2-1)

前回はCALayerの基本的な振る舞いやプロパティについて記載しました。

  • Lesson1(CALayerのプロパティについて)
  • Lesson1-4〜(CALayerのプロパティについて続き)
  • Lesson1-7(カスタム描画)
  • 今回は実際にアニメーションを実践してみます。難しそうな暗黙的アニメーションとか明示的アニメーションの説明は置いておいて、別の機会に説明できればと思います。

    一番簡単にアニメーションを実装するには、UIViewクラスのブロックベースアニメーションメソッドを使用することです。
    現時点(iOS9)で、ブロックベースのアニメーションメソッドは、大きく3種類ありますね。
    
     • アニメーション(直線的)
     • トランジションアニメーション(画面が移り変わるようなアニメーション)
     • キーフレームアニメーション(非直線的)
     
    
    アニメーション(直線的)

    簡単なアニメーション実装であればこのメソッドで十分でしょう。一番ベーシックなアニメーション実装です。アニメーション用のブロックベースメソッドはスプリングのようなバウンドアニメーションを実現するメソッドも有りますが、まずはスプリングアニメーションの無い、基本のブロックベースアニメーションメソッドを試してみます。

    Viewが画面上方向へ移動するだけのアニメーションです。上記アニメーションの実装は以下のようになります。(swift)

    1. // アニメーション実行
    2. UIView.animateWithDuration(0.5, delay: 0.0, options: UIViewAnimationOptions.CurveEaseInOut, animations: {
    3.  
    4. // myViewの中心点y座標を変更
    5. self.myView.center.y = 100
    6. }) { (complete) in
    7.  
    8. // アニメーションが完了したら、myViewの背景色を赤色に
    9. self.myView.backgroundColor = UIColor.redColor()
    10. }

    アニメーション時間0.5秒で、myView(アニメーションしているViewです)の中心点y座標を100に変更して、アニメーションが完了したらmyViewの背景色を赤色に変更します。簡単ですね。たったこれだけのコードでアニメーション出来てしまいます。

    上記アニメーションを実装しているUIViewクラスのアニメーションブロックメソッドの定義が以下です。(swift)

    1. class func animateWithDuration(_ duration: NSTimeInterval,
    2. delay delay: NSTimeInterval,
    3. options options: UIViewAnimationOptions,
    4. animations animations: () -> Void,
    5. completion completion: ((Bool) -> Void)?)

    引数の意味は、

    引数 意味
    duration アニメーション全体の実行時間(秒)。短ければ早いアニメーション、長ければ遅いアニメーションになる。
    delay 遅延時間(秒)。指定した時間待ってからアニメーションが実行される。
    options アニメーションオプション。実行するアニメーションに対するオプションを指定する。詳細はいずれしますが、例ではアニメーションカーブを指定しています。UIViewAnimationOptions列挙型で指定可能なアニメーションカーブは主に、CurveLinear, CurveEaseInOut, CurveEaseIn, CurveEaseOut となっています。デフォルト値はCurveEaseInOut(ゆっくり加速して、ゆっくり減速して終わる)です。
    animations アニメーションブロックオブジェクト。UIViewクラスのanimatable propertiesのパラメータを操作する。
    completion 完了時ブロックオブジェクト。アニメーション完了時に実行する処理を記載する。
    animations引数

    animationsブロックでは、アニメーション終了時の値を設定します。つまり、アニメーションはアニメーション開始前の値とanimationsブロックで指定するアニメーション終了時の値を元に、その間の値を直線的に補完することでアニメーションを行います。変更可能な値は以下に示すUIViewクラスのアニメーション可能なプロパティに限られています。

    • @property frame
    • @property bounds
    • @property center
    • @property transform
    • @property alpha
    • @property backgroundColor
    • @property contentStretch
    例えば、

    [Viewを動かしたい場合(move)]

    centerかframeのoriginを変更するのかな良いでしょう。これは一番はじめの例の通りです。

    1. // アニメーション実行
    2. UIView.animateWithDuration(0.5, delay: 0.0, options: UIViewAnimationOptions.CurveEaseInOut, animations: {
    3.  
    4. // myViewの中心点y座標を変更
    5. self.myView.center.y = 100
    6. }) { (complete) in
    7. // アニメーションが完了したら、myViewの背景色を赤色に
    8. self.myView.backgroundColor = UIColor.redColor()
    9. }

    [Viewのサイズを変更したい場合(scale)]

    frameのsizeかtransformを使用するのが良いでしょう。上記はtansformを使用してviewの高さ、幅を2倍に拡大しています。animationsブロックのコードは以下のようになるでしょう。

    1. // アニメーション実行
    2. UIView.animateWithDuration(0.5, delay: 0.0, options: UIViewAnimationOptions.CurveEaseInOut, animations: {
    3.  
    4. // サイズ変更
    5. // transform
    6. let transform = CGAffineTransformMakeScale(2.0, 2.0)
    7. self.myView.transform = transform
    8. }) { (complete) in
    9.  
    10. // アニメーションが完了したら、myViewの背景色を赤色に
    11. self.myView.backgroundColor = UIColor.redColor()
    12. }

    [透過させたい場合(alpha)]

    alpha を変更します。上記はalpha値を変更してだんだんと透明になっていくアニメーションです。animationsブロックのコードは以下のようになるでしょう。

    1. // アニメーション実行
    2. UIView.animateWithDuration(0.5, delay: 0.0, options: UIViewAnimationOptions.CurveEaseInOut, animations: {
    3.  
    4. // alpha
    5. self.myView.alpha = 0.0
    6. }) { (complete) in
    7.  
    8. // アニメーションが完了したら、myViewの背景色を赤色に
    9. self.myView.backgroundColor = UIColor.redColor()
    10. }

    [背景色を変更したい場合(bgcolor)]

    backgroundColor を変更します。上記は背景色が青色からだんだんと赤色へアニメーションします。animationsブロックのコードは以下のようになるでしょう。

    1. // アニメーション実行
    2. UIView.animateWithDuration(0.5, delay: 0.0, options: UIViewAnimationOptions.CurveEaseInOut, animations: {
    3.  
    4. // 背景色
    5. self.myView.backgroundColor = UIColor.redColor()
    6. }) { (complete) in
    7.  
    8. // アニメーションが完了したら、myViewの背景色を赤色に
    9. self.myView.backgroundColor = UIColor.redColor()
    10. }

    あと、boundscontentStretchが出て来ていませんが、あまり用途は無いと思います。 こちらこちらを参照する事でなんとなくイメージがつかめるでしょう。

    [複数のプロパティ値を組み合わせたアニメーション]

    例として、プロパティを一つづつ変更しましたが、移動しながら、拡大縮小、フェードアウトしたりと、それぞれを組み合わせても良いです。

    1. // アニメーション実行
    2. UIView.animateWithDuration(0.5, delay: 0.0, options: UIViewAnimationOptions.CurveEaseInOut, animations: {
    3.  
    4. // 全て指定
    5. self.myView.center.y = 100
    6. let transform = CGAffineTransformMakeScale(2.0, 2.0)
    7. self.myView.transform = transform
    8. self.myView.alpha = 0.0
    9. self.myView.backgroundColor = UIColor.redColor()
    10. }) { (complete) in
    11.  
    12. // アニメーションが完了したら、myViewの背景色を赤色に
    13. self.myView.backgroundColor = UIColor.redColor()
    14. }

    凝ったアニメーションでなければ、殆どはこのメソッドでこと足りるでしょう。
    本ページで作成した確認用アプリはGitHubで公開しています。コードの詳細は次のURLを参照下さい。https://github.com/takuran/CoreAnimationLesson
    CoreAnimation Lesson.シリーズへのリンク。

    2016年6月14日火曜日

    UIViewのframeとboundsプロパティの違いについて

    なんとなく違いは分かっていましたが、いつもframeで事足りていたので、正確には理解していなかったのと、boundsのoriginを変更した時の挙動が分からなかったので調べてみました。

    frameとboundsの座標系の違い

    簡単に言ってしまうと、frameとはsuperviewを基点に考えた座標系です。boundsとはローカルviewを起点に考えた座標系になります。

    左側の図はviewの左上の原点が(0, 0)の幅150、高さ200のview。 右側の図はviewの左上の原点が(50, 50)で同サイズのview。 viewのframe値に関係なくboundsは自身の座標系を示すので常にoriginは(0, 0)を示していますね。sizeはframeもboundsも同じ値で(150, 200)です。 この例ではboundsのoriginはframeのoriginに影響を受けない事は分かりますが、そこまでしか分かりませんね。実はviewを拡大縮小・回転してみるともっと違いがはっきりとして来ます。以下で回転した場合の例を示します。

    拡大縮小・回転時には注意が必要

    viewを回転したり、拡大縮小した場合はどうなるのでしょうか。これでなんとなく違いが見えてくると思います。

    下の図は左側にあるsubviewを右回転したものが右側の図になります。subviewには分かりやすい様に画像を貼り付けています。

    frameの値はアファイン変換(回転、拡大縮小)により本来のframe値ではなく、変換後のviewを囲う様な値で再定義されてしまっています(青枠)。ですので、もう描画時の座標計算には使えないでしょう。この事は、「iOS view プログラミングガイド」にこう記されています。

    重要: ビューのtransformプロパティが恒等変換でない場合、そのビューのframeプロパティの値 は未定義となり、無視する必要があります。ビューに変換を適用する場合は、ビューのboundsおよ びcenterプロパティを使用して、ビューのサイズと位置を取得する必要があります。サブビューの フレーム矩形はビューの境界に対して相対的であるため、有効なままです。

    transformした場合はframe値を使わずに、boundsやcenterプロパティ値を使用して、viewサイズや中心点を求める必要があるようですね。回転してもboundsプロパティ値の方は変化無しです。ローカルviewを起点に考えているのでsuperviewがどのように変化しても値に変化が現れないのは理解出来ます。

    以下に、viewを1回転した場合のアニメーションgifを載せています。viewの回転角度によってframeが刻々と変化する様子が分かると思います。

    上記のアプリはGitHubで公開していますので、宜しかったらダウンロードして実際に動かしてみてください。レポジトリは ViewFrameBoundsIndicatorで公開しています。

    bounds のoriginプロパティ

    さて、boundsのoriginプロパティ値は、デフォルト値で常に(0,0)を指しています。この値を変更するとどうなるのでしょうか。

    実はsubviewを作成しただけではこの違いに気付くことが出来ません。subviewの中に更にsubviewを作成して初めて違いが見えてきます。 図では、subviewの中にUIImageViewをsubviewとしてaddしています。因みに画像はお寿司ですよ。

    それではboundsのoriginを変更してみましょう。確認用のアプリからboundsのoriginを変更してみます。

    わかります?boundsのoriginを変更するとsubviewの中がスクロールしているかのように見えます。 もっと分かりやすくするためにsubviewのclipToBoundsをoffにしてみます。因みに緑枠がboundsの矩形で、青枠がfraneの矩形です。

    これでイメージがついたのではないでしょうか。subviewのbounds originを変更する事で、そのsubviewのsubviewとの座標系をずらすことが出来ます。offset値を設定しているイメージでしょうか。以下に静止画のイメージも載せておきます。subviewのsubview座標をずらして表示していることがイメージ出来ますでしょうか。

    ps: WWDC16 Keynote 見ながら書いてます。ヤバいそろそろ寝ないと!

    GitHubにも上げていますが、ViewControllerのソースを貼り付けておきます。

    1. import UIKit
    2.  
    3. class ViewController: UIViewController {
    4.  
    5. @IBOutlet weak var boundXSlider: UISlider!
    6. @IBOutlet weak var boundYSlider: UISlider!
    7. @IBOutlet weak var rotationSlider: UISlider!
    8. @IBOutlet weak var detailTextView: UITextView!
    9.  
    10. var targetView: UIView!
    11. var targetSubView: UIImageView!
    12. var frameLayer: CALayer!
    13. var boundsLayer: CALayer!
    14. @IBOutlet weak var clipBoundsSwitch: UISwitch!
    15.  
    16. override func viewDidLoad() {
    17. super.viewDidLoad()
    18.  
    19. targetView = UIView(frame: CGRect(x: 0, y: 0, width: 150, height: 200))
    20. targetView.center = CGPoint(x: view.frame.width / 2, y: 200)
    21. targetView.backgroundColor = UIColor.whiteColor()
    22. targetView.layer.contentsScale = UIScreen.mainScreen().scale
    23. targetView.clipsToBounds = true
    24.  
    25. // sub sub view
    26. targetSubView = UIImageView(frame: CGRect(x: 0, y: 0, width: 150, height: 200))
    27. targetSubView.image = UIImage(named: "C789_unitoikuramaguro_TP_V.jpg")
    28. targetSubView.contentMode = UIViewContentMode.TopLeft
    29. targetSubView.layer.contentsScale = UIScreen.mainScreen().scale
    30.  
    31. // add to sub view
    32. targetView.addSubview(targetSubView)
    33. // add to superview
    34. // view.addSubview(targetView)
    35. view.insertSubview(targetView, atIndex: 0)
    36.  
    37. // layer of indicating frame border line
    38. frameLayer = CALayer()
    39. frameLayer.frame = targetView.frame
    40. frameLayer.backgroundColor = UIColor.clearColor().CGColor
    41. frameLayer.borderColor = UIColor.blueColor().CGColor
    42. frameLayer.borderWidth = 2.0
    43. view.layer.addSublayer(frameLayer)
    44.  
    45. // layer of indicating bounds border line
    46. boundsLayer = CALayer()
    47. boundsLayer.frame = targetView.bounds
    48. boundsLayer.backgroundColor = UIColor.clearColor().CGColor
    49. boundsLayer.borderColor = UIColor.greenColor().CGColor
    50. boundsLayer.borderWidth = 2.0
    51. targetView.layer.addSublayer(boundsLayer)
    52.  
    53. // information
    54. detailTextView.text = "frame: \(targetView.frame)\nbounds: \(targetView.bounds)\ncenter: \(targetView.center)"
    55. print("targetView frame : \(targetView.frame)")
    56. print("targetView bounds: \(targetView.bounds)")
    57. print("targetView center: \(targetView.center)")
    58. // slider handler settings
    59. boundXSlider.addTarget(self, action: #selector(changeBoundsHandler), forControlEvents: UIControlEvents.ValueChanged)
    60. boundYSlider.addTarget(self, action: #selector(changeBoundsHandler), forControlEvents: UIControlEvents.ValueChanged)
    61. rotationSlider.addTarget(self, action: #selector(changeBoundsHandler), forControlEvents: UIControlEvents.ValueChanged)
    62.  
    63. }
    64.  
    65. override func didReceiveMemoryWarning() {
    66. super.didReceiveMemoryWarning()
    67. // Dispose of any resources that can be recreated.
    68. }
    69.  
    70.  
    71. func changeBoundsHandler(sender: AnyObject) {
    72.  
    73. if boundXSlider == sender as! NSObject {
    74. // x
    75. targetView.bounds.origin.x = (targetSubView.image!.size.width - targetView.bounds.width) * CGFloat(boundXSlider.value) / 2
    76.  
    77. } else if boundYSlider == sender as! NSObject {
    78. // y
    79. targetView.bounds.origin.y = (targetSubView.image!.size.height - targetView.bounds.height) * CGFloat(boundYSlider.value) / 2
    80. } else if rotationSlider == sender as! NSObject {
    81. // rotation
    82. let transform = CGAffineTransformMakeRotation(2 * CGFloat(M_PI) * CGFloat(rotationSlider.value))
    83. targetView.transform = transform
    84. }
    85. // update layer of frame
    86. frameLayer.frame = targetView.frame
    87. boundsLayer.frame = targetView.bounds
    88.  
    89. // information
    90. detailTextView.text = "frame: \(targetView.frame)\nbounds: \(targetView.bounds)\ncenter: \(targetView.center)"
    91.  
    92. }
    93.  
    94. @IBAction func changeSwitchHandler(sender: AnyObject) {
    95. targetView.clipsToBounds = clipBoundsSwitch.on
    96.  
    97. }
    98.  
    99. }
    100.  
    GitHub URL: https://github.com/takuran/ViewFrameBoundsIndicator
    参考URL http://stackoverflow.com/questions/1210047/cocoa-whats-the-difference-between-the-frame-and-the-bounds/28917673#28917673